Monthly Archives: September 2024

The Great Squirrel Battle for the Bulbs

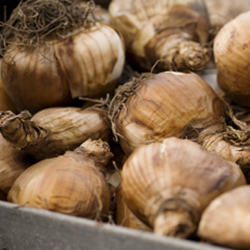
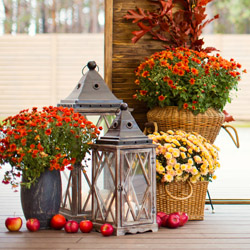
Autumn is the catalog time of year, when gardeners devour and drool over the spring-blooming bulb catalogs, eagerly fantasizing about next year’s flowerbeds. We picture drifts of crocus and gaily swaying tulips, lush daffodils and glorious hyacinths. Snowdrops, irises, daylilies… Ah, the garden will be great this next spring.

Then we remember last spring – hours of labor and dozens of bulbs meticulously planted, but only one or two emerged to flaunt their blooms. What happened?

Squirrels and Bulbs

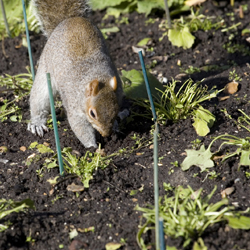
Squirrels like flower bulbs just as much as gardeners, but unfortunately not for their beauty. From the looks of the remains – chewed remnants, dug up holes, battered foliage – those bulbs became expensive squirrel food. Fortunately, if you want to plant daffodils, alliums, scilla, hyacinths, squills or fritillaria, your bulbs should be safe. Generally, squirrels don’t eat these. But how can you protect the bulbs that make the tastiest squirrel treats?

Keeping Squirrels Out of the Flowerbeds

Go ahead and order your bulbs. While you’re waiting for delivery, decide which of the three basic methods you will use to prevent the squirrel attacks. A small investment of time and materials will protect your bulbs.

  1. Mesh Barriers
    Wire mesh is the best protection to keep squirrels away from bulbs. Dig the hole for several bulbs, make a “cage” using mesh around the bulbs and fill in the soil. If the squirrels dig, the mesh will prevent them from eating the bulbs. You may also plant the bulbs as usual and place a layer of mesh on the soil. You’ll have to secure it to keep it in place then cover with mulch. Be sure the mesh layer is wide enough so squirrels cannot easily dig around the sides to reach the bulbs.
  1. Repellants
    Garden centers sell many different squirrel repellants, and deer repellants also repel squirrels. Some gardeners swear to the effective use of red pepper flakes mixed in the soil around, and over, the bulbs. Many squirrels don’t like spicy tastes, but pepper flakes may need to be replaced after heavy spring rains to be the most effective.
  1. Sharp Gravel
    Adding sharp gravel to the soil around and over the bulbs also deters squirrels from digging. Not only do they not like the feel of the gravel on their sensitive paws, but the gravel – which is heavier than dirt or mulch – is more difficult to move, so the bulbs stay safer.

There is another option to keep squirrels away from bulbs without completely discouraging their visits. If you can’t beat ’em, join ’em – because squirrels look for the easiest food sources, a squirrel feeding station stocked with corn and peanuts may be just the thing to keep the squirrels from looking for your buried treasures!

squirreldigging_250x250

bulbs_250x250

Over-Wintering Container Plants Outdoors

All containerized plants that are considered hardy in your zone can spend the winter outdoors, but you do need to take a little special care to keep them safe and comfortable as temperatures drop. Despite their hardiness, winter is still a challenging season, but it is possible to keep your container plants healthy until the days grow longer and warmer again.

Options to Overwinter Your Container Plants

  • In the late summer or fall, removed the plant from its container and plant it in the ground while the soil is still warm. Another method is to bury the pot, with the plant in it, in the garden and remove the pot following spring. Both of these methods will help insulate the root system, preventing it from freezing solid and killing the root system.
  • Place containerized plants in an unheated garage but along a heated wall. This is an excellent method for very large pots or porous pots that tend to break apart from the constant cycle of freezing and thawing, and so would not be very hardy if buried. For extra root protection and insulation, wrap the pots in plastic bubble wrap or wrap an old comforter or quilt around the pots.
  • Group pots together along the sunny side of your house or shed. If this area is windy, create a windscreen with stakes and burlap. Place bales of straw or hay around the perimeter of the grouping up against the pots to further protect plants from cold winds. Fill in areas between pots with mulch, shredded leaves, grass clippings or hay for insulation. Lay evergreen branches or place a layer of mulch on top of the pots for additional protection.
  • Use a cold frame covered with plastic or Reemay fabric to help control temperatures and reduce light as well, helping plants stay dormant in winter. It will still be necessary to use mulch, shredded leaves or hay around and in-between pots for insulation. Rodent control, such as Havahart traps, may be necessary when using this method.

Watering Container Plants in Winter

Make sure that plants go into the winter with moist soil so that there is water available to plant roots. Check soil moisture occasionally, never allowing it to dry completely. It is also a very good idea to spray needled and broadleaf evergreens with an anti-desiccant. This acts as a protective coating for plant foliage and stems as it helps them retain moisture.

With just a little care and forethought, you can easily prepare containers for winter without risking the plants and arrangements you have so carefully cultivated.

over-winter-2
over-winter-1

Entrance Way Evergreens

Cool and classic or chic and contemporary, no matter what your style, you’ll always be proud of an entrance flanked with beautiful containers highlighting just-right evergreens. In this case, “evergreen” doesn’t necessarily mean a conifer, either – many other shrubs remain green in the winter and can be beautiful showpieces welcoming guests to your home.

Planting Your Container

Entrance way evergreens are generally planted in containers and frame a doorway, walkway or arch. If you truly want your evergreens to take center stage, opt for more understated, neutral containers, but select shapes that match the architecture of your home. You can opt for a boldly colored container, but take care that the container’s decorations won’t overwhelm your evergreens.

You will want to use high quality potting soil for the container to provide adequate nutrition for your evergreens to thrive. Also pay careful attention to the moisture levels, watering the plants appropriately – containers often need more frequent watering than plants in your landscape. You can rotate the containers regularly to help the plants get even sun exposure, and regular fertilizing will help keep them healthy.

If you’re not sure how to plant a container, try this simple formula: “Use a thriller, filler and spiller.” Thriller refers to the tallest or showiest plant, the one that immediately catches the eye. The fillers are the plants surrounding the thriller that add more structure and bulk to the arrangement, filling in empty spaces. The spillers are plants to grow over, and soften, the edge of the container, giving it a more natural, organic look.

Here’s a listing of “thriller” plants to consider for your door decor. We can make recommendations of dwarf cultivars of many of these plants. Dwarfs will take longer to out-grow their container. Happy potting!

  • Shade
  • Azalea*
  • Boxwood
  • Camellia*
  • Evergreen Viburnum*
  • Japanese Andromeda*
  • Heavenly Bamboo*
  • Mountain Laurel*
  • Sun
  • Arborvitae
  • False Cypress
  • Juniper
  • Heavenly Bamboo*
  • Holly
  • Pine
  • Spruce
  • Yews
  • Yucca*


* These plants flower!

Accents for Your Entrance Evergreens

In addition to welcoming your visitors with a beautiful entrance, it’s easy to entertain them and show your style when you accessorize your evergreens. Festively dress your plants to coordinate with seasons or holidays. Fun and creative options include…

  • Spring: Small bunnies, silk spring blooms such as daffodils, pastel Easter eggs
  • Summer: Patriotic flags or ribbons for Memorial Day and the Fourth of July
  • Fall: Scarecrows, pumpkins, Indian corn, Halloween decorations
  • Winter: Holly sprigs, tiny twinkling lights, beaded garlands, snowflake ornaments

You can also personalize your entrance evergreens for birthdays, anniversaries or to showcase your favorite teams, colleges, hobbies and more. All are easy to do, fun, and affordable, and make your entrance truly eye-catching.


Fall Lawn Care

Fall is the best time of the year to overseed your existing lawn or establish a new lawn. If your lawn is a bit thin, has bare patches or needs good care, now is the time to take care of it so it can become thoroughly established before warm temperatures arrive in spring.

Overseeding A Weak Lawn

A weak lawn may have thin or scraggly patches, seem overrun with weeds or have bare patches that are difficult to keep green and lush. Overseeding can help eliminate these problem areas and create a more consistent, luxurious lawn.

  1. Spray broadleaf weeds with a selective herbicide and wait 2 weeks for the weeds to disappear. Several treatments may be necessary if the yard is thick with weeds.
  2. Take a soil sample of your lawn to determine the pH. A garden extension service can help determine pH levels, or home test kits are available.
  3. Mow shorter than normal and rake clean to remove unnecessary debris that may keep seeds from reaching the soil.
  4. Core aerate if you have compacted soil or heavy thatch. Remove the cores and dispose of them properly to keep the soil light and airy for seeding.
  5. Apply starter fertilizer and lime if determined to be needed by the pH test, or choose a grass type that will thrive in your soil’s conditions.
  6. Dethatch your lawn if thatch is thicker than ½ inch. This can be done with heavy raking or a special dethatching rake may be necessary in extreme cases.
  7. Overseed with the proper seed. If core aerating, lightly topdress with topsoil or humus.
  8. If needed, cover the freshly seeded area with netting or hay to discourage birds or other wildlife from consuming the seed before it grows.
  9. Water daily until grass has germinated, then soak once a week to encourage deep root growth.
  10. Fertilize in late fall with fall fertilizer.

Seeding A New Lawn

If you have no existing lawn or the entire ground is overrun with nothing but weeds, it may be best to start from scratch and create the lawn of your dreams.

  1. Kill existing vegetation with nonselective herbicide. If you want to preserve nearby trees or shrubs, take steps to protect that vegetation from the treatment.
  2. Take a soil sample of your lawn to determine the pH. A testing kit can provide a good pH estimate, or a gardening center or garden extension service can provide a more precise evaluation.
  3. Prepare soil by breaking up the surface with a rake or spade using a crisscross pattern. All large lumps should be broken up, and any large rocks should be removed.
  4. Broadcast starter fertilizer, lime and gypsum as determined by the pH test. This will provide a nutrition boost for fresh seeds.
  5. Spread topsoil or humus to a ½ inch depth for appropriate planting.
  6. Rototill to a depth of 4 inches and grade smooth. This will mix all the top layers together for uniform soil and nutrition, ensuring even turf growth.
  7. Sow proper seed and mulch lightly with salt hay to control erosion and conserve moisture.
  8. Water daily until grass has germinated, then soak once a week to encourage deeper root growth to resist droughts and repel weeds.
  9. Fertilize in late fall with fall fertilizer to provide nutrition throughout the season.

Which Seed?

Not every lawn will thrive with the same type of grass seed. Allow our staff to help you select the seed that best suits your needs, soil type and planting conditions. Apply at the recommended rate and incorporate into the top ¼” of soil. Do not bury the seed or it may not germinate evenly.

No matter what the condition of your lawn, fall is the best time to take steps to help it rejuvenate so you have an amazing lawn to enjoy in spring.


Plant a Tree This Fall

There are so many reasons to add a new tree to your landscape this fall that it’s hard to find a reason not to.

Just think about it, trees will…

  • Beautify the Environment
    Trees add texture and color to the landscape. They soften the harsh lines of buildings and driveways, while their foliage and blooms add seasonal color changes and variety.
  • Stabilize Soil
    Tree roots prevent soil from blowing or washing away, minimizing erosion and providing protection for the surrounding landscape.
  • Provide Wildlife Habitat
    Trees provide shelter and food for birds and numerous small animals, including squirrels, raccoons, insects and more.
  • Make Food
    Many trees provide fruits, nuts, seeds, sap and berries for human consumption. Wildlife will also rely on the food provided by trees.
  • Create Oxygen
    Through photosynthesis, trees take in carbon dioxide, carbon monoxide, sulfur dioxide and other poisons from our air and release pure oxygen for us to breathe. One tree can produce enough oxygen for 10 humans for one year!
  • Filter the Air
    Trees act as giant filters trapping dust and pollution particles with their leaves and bark until the rain washes the particles away.
  • Cool the Air
    Air will remain several degrees cooler in the shade of a tree canopy. This is accomplished by not only by blocking the sun’s rays but also through transpiration. Tree leave transpire, or release moisture, which cools the surrounding air. A large tree can release as much as 400 gallons of moisture from its leaves daily.
  • Reduce Utility Bills
    Deciduous trees planted on the south and southwest sides of a home will shade the structure during hot summer months and reduce air conditioning or other cooling needs. In the winter, with the leaves fallen, the sun is able to warm the structure, reducing heating bills.
  • Reduce Noise Pollution
    Strategically planted, trees can dramatically reduce the volume of unwanted noise from loud neighbors, nearby businesses or car traffic.
  • Hide undesirable views
    Purposefully sited, trees can camouflage unattractive views and create privacy, providing a natural sanctuary in your yard.

In our area, fall is just about the best time of year to purchase and plant a tree. The soil is warm, air temperature is cool and morning and evening dew increase available moisture to nurture a new tree. Stop in and see our extensive collection, and we can assist you in choosing the tree that is perfect for your landscape and lifestyle needs.

PlantATree_2

PlantATree_3

PlantATree_1

Bringing Your Tropical Plants Indoors for the Winter

As the summer comes to an end and autumn approaches, the days get shorter and cooler temperatures signal the time to ready your plants for winter. How can you protect your treasured tropicals from winter damage?

Overwintering Tropical Plants

Don’t wait until frost warnings or freezes occur to bring tropical plants inside, especially since these plants are more susceptible to dropping temperatures. Try to have all of your plants acclimated to the new indoor environment by the end of October. Avoid the temptation to move your tropicals back outside if it suddenly gets warm, because they will have to re-acclimate when you bring them back inside again. With a little extra care even exotic hibiscus can be over-wintered inside the house.

First, it’s a good idea to prune approximately one-eighth to one-fourth off the total height of the plant’s foliage. This helps reduce the shock that the plant receives with the change of conditions when bringing them indoors. Check the plants for signs of insects and treat them with insecticidal soap or pyrethrin spray as well as a systemic insecticide that will provide protection for up to six weeks.

Position indoor tropical plants in a very bright location that receives no less than 6 hours of light per day. If the winter is very cloudy, supplement your plants with an artificial light source. Be sure the room is warm, but avoid putting the plants too close to a heating vent, which can dry them out drastically.

Because they are tropical plants, they will need good humidity which can be achieved by using a humidity tray. Use a saucer that is at least 3-4 inches larger than the pot and fill it with an inch of stones. Pour water over the stones until they are half covered, then place the pot on top of the stones. The humidity immediately around the plant will be increased, but avoid setting the pot directly in any water, which can lead to fungus and rotting. Grouping several plants close together can also help them preserve humidity for more luxuriant growth.

Fertilizing should be continued throughout the winter, but at a rate of once per week. You will find the plant will not utilize as much water in the winter because its growth has slowed. Generally, plants should be watered every 4-7 days depending on location, pot size, soil type and plant type.

If you have any questions about winter care of your plants, our staff will be glad to help you keep your tropicals in good condition all winter long.


Fantastic Fall Shrubs

Shrubs can be real showstoppers in fall as they provide layers of color and texture to your autumn landscape. Adding these top 10 fantastic fall shrubs to your yard can bring the beauty of the season to all your beds and borders.

Top 10 Fall Shrubs

There are many stunning shrubs and hedges that offer colorful foliage, long-lasting berries, and other fantastic features to enjoy through fall and into winter. While the best shrubs for your yard will depend on the soil type, sunlight levels, and general climate available, these ten choices are amazing options for most landscapes.

  1. Arrowwood Viburnum (Viburnum dentatum)
    Many viburnum species are great fall shrubs, but arrowwood viburnum is truly outstanding with its yellow, orange, and red autumn colors on toothed leaves. This comes after bright white flowers appear in spring and early summer followed by beautiful blue berries.

Plant arrowwood viburnum as a dramatic background for landscaping beds or back borders in the yard. This shrub can tolerate many soil types, even clay soils, and is hardy through winter for easy maintenance.

  1. Beautyberry (Callicarpa sp.)
    The foliage of beautyberry may not be dramatic, but its tightly clustered berries in bright purple to magenta shades add a pop of color to the late summer and autumn landscape. Birds and wildlife will feast on these berries, bringing energy and action to the yard as well.

    Beautyberry grows best in moist, rich soil, preferably in full sun to part shade. As a disease-resistant shrub, this is a good choice for beginners and expert gardeners alike, and it looks best in groups or when scattered amongst other shrubs in a thicket-like setting.

  2. Bottlebrush Buckeye (Aesculus parviflora)
    The large leaves of bottlebrush buckeye make a dramatic autumn show in brilliant yellow and gold hues. Vivid fall colors brighten the late season landscape and follow summer flowering of upright white blossoms.

    Well-drained, preferably rich soil is best to help this shrub reach its full potential. Adding plenty of organic matter to the native soil when planting will help to improve drainage. Be sure to give this plant lots of room to spread.


  1. Chokeberry (Aronia sp.)
    There are several species of chokeberries that can be beautiful additions to the autumn landscape. While their foliage will vary, it is the bold crop of berries in shades ranging from red to purple to nearly black that add interest to the yard, and will attract birds and wildlife.

    These shrubs perform best and produce the heartiest berry crops when planted in well-drained soil in full sun to part shade. The more sun the plant receives, the more luxurious its foliage and berry crop will be for a superb autumn performance.

  2. Fothergilla (Fothergilla sp.)
    Also called witch alder, this taller shrub is well-known for its downy twigs. In fall, however, its foliage will put on a stunning show of bright yellow, orange, or red foliage – often with all colors appearing on the same plant.

    This low-maintenance shrub prefers moist, rich, acidic soil, and should be positioned in full sun to part shade for the best fall performance. It is relatively slow-growing but will continue to show its amazing autumn colors each year.

  3. Heirloom Roses (Rosa sp.)
    Many types of heirloom roses can reveal a surprising pop of autumn color when allowed to mature to colorful hips, which can appear in shades of orange, red, and purple. Semi- and semi-double bloom varieties will yield the most hips for fall color and interest.

    Take care to plant heirloom roses where they will thrive best, depending on the sunlight levels and soil types each variety prefers. To encourage hip formation, avoid deadheading in late summer so the hips can come to maturity.

  4. Highbush Blueberry (Vaccinium sp.)
    Highbush blueberry’s beauty goes far beyond its crop of tasty summer berries. In autumn, this shrub bursts into bold shades of red, orange, yellow, or purple, and its green or red twigs also provide additional color and interest into winter.

    Grow this shrub in acidic soil, sandy and well-drained is best. This plant prefers full sun for the best growth.

  5. Itea (Itea viriginica)
    Often known as Virginia sweetspire, this shrub has stunning firework-like sprigs of white flowers in early summer, and it is a favorite of butterflies. In autumn, however, this deer-resistant shrub bursts into rich hues of yellow, orange, red, and mahogany.

    Itea can thrive in full shade to full sun and is a great option not only for the landscape, but for autumn-themed containers and porch pots as well. The berries this shrub produces in late summer will also attract birds and wildlife.

  6. Oakleaf Hydrangea (Hydrangea quercifoli)
    The oak-like leaves of this colorful hydrangea are reminiscent of the most popular deciduous trees, and turn bold hues of purple, bronze, red, and orange as fall advances. This is well after the plant’s big summer flowers, that range from white to purple to pink, have faded.

    This plant prefers rich, well-drained, slightly acidic soil amended with compost to add rich nutrition for abundant flowering. While these plants thrive in part shade to full sun conditions, the autumn color will be more brilliant if the shrub is in full sun.

  7. Red Twig Dogwood (Cornus sericea)
    While the foliage of red twig dogwood will briefly turn rose or golden before fading to brown, it is the unexpected brightness of its stems in sharp crimson hues that make it outstanding in the fall and winter landscape, long after the leaves have fallen.

    This shrub will do best in slightly acidic, moist soils, and it will be happiest if it receives at least four hours of sun per day. Lightly shaded placements, particularly from afternoon sun, are suitable for red twig dogwood.

Caring for Fall Shrubs

No matter which shrubs you choose to add autumn drama to your yard, they will need proper care to perform their best. Be sure to site them with the appropriate sunlight levels and amend soil as necessary to provide a supportive pH for healthy growth and brilliant color. Mulch autumn shrubs to protect their root systems as seasonal temperatures drop. Choose these fantastic fall shrubs for a glorious autumn palette in your yard for years to come.


Fall Chrysanthemums

No flower is more iconic of autumn than the chrysanthemum, and these beautiful mounding perennials are ideal for fall flowerbeds, pots, window boxes, borders, and many other uses. How will
you get creative with chrysanthemums this fall?

Why We Love Chrysanthemums

Just when many other flowers are fading at the end of summer, chrysanthemums, or mums, are coming into their glory with a range of stunning autumn colors. Depending on the cultivar, these plants sport yellow, white, red, orange, bronze, pink, peach, wine, purple, and bicolored blooms. The flowers range from small, button-like blossoms to larger blooms reminiscent of daisies. Mum blooms are long-lasting when cut and they’re just as lovely in floral arrangements and bouquets as they are planted in containers, flowerbeds, and the landscape. This makes mums extremely useful for all manner of autumn décor.

Chrysanthemums are native to east Asia and northern Europe and were first domestically cultivated in China nearly 600 years ago. Today, there are more than 20,000 chrysanthemum cultivars worldwide. They are deer- and rabbit-resistant, making them a hardy option for landscaping beds, and with a bit of thoughtful care, these tender perennials can be a wonderful addition to any flower garden or fall containers.

Caring for Chrysanthemums

The hardiness of chrysanthemums depends on the cultivar as well as the local climate and even the microclimate in your landscape. These flowers prefer well-drained, rich soil with a neutral pH, so it is best to use a good quality potting soil in containers. When planting chrysanthemums in the garden or landscape, mixing compost or peat moss in the planting hole will help increase drainage and nourish the soil to promote the best blooms. A good rule of thumb is that if soil is good for vegetables, it will also be good for mums – making them a wonderful choice to refresh a garden after the summer harvest has finished.

Chrysanthemums grow best in full sun requiring a minimum of six hours per day. If mums are planted in containers, consider using a mobile plant cart or a stand with casters so  that the pots may be moved to brighter areas, if needed, as the season progresses.

Chrysanthemums prefer evenly moist, but not soggy, soil. Because of their thick, mounding habit, it is best to water mums from below suing a soaker hose or irrigation drip system in garden beds. In pots, mums should again be watered from below the plant but above the soil line. A watering wand will make this job direct and easy. Be sure to drain excess water from saucers after watering so the roots do not remain continually wet.

Fertilizing chrysanthemums every month through the spring and early summer, with a balanced fertilizer, will help them grow and bloom well, but if mums are planted in the Fall, they should not need extra feeding as long as they were planted in rich, nutritious soil. Deadheading spent blooms by pinching them back can encourage more flowering and help mums maintain their compact, mounding habit.

Decorating with Fall Mums

Chrysanthemums are a beautiful choice not only in the garden, but are equally lovely in welcoming porch pots, deck or patio containers, or even small indoor pots and arrangements. Add an extra touch of fall with rustic containers, such as wine barrels, baskets, or terra cotta pots, or glam up your mums in hammered copper or bronze pots that will accentuate their color. A burlap ribbon or bow can be a charming accent, and you can give more seasonal flair to mum arrangements or flowerbeds by adding pumpkins and gourds as fun decorations. Indoors, use small pails or pots for petit mum arrangements, or add them to larger arrangements with grain sprigs, dried pods, colorful leaves, or twists of grapevine for additional texture.

Fall chrysanthemums can be a pleasant burst of autumn color, whether they are part of the landscape or are used in containers, pots, or arrangements and we carry a wide selection to make your fall home suit the season!


Autumn: Why Plant Now?

Although many gardeners plant trees and shrubs in the spring, knowledgeable gardeners plant in the fall to take advantage of all this fabulous season has to offer. But why is fall planting better than spring planting?

  • Stress Reduction
    Transplanting causes stress as plants are removed from containers, balls or established locations and changed to new locations. Planting in the fall, when a plant is entering dormancy and is generally hardier and sturdier, reduces this stress so the plant can thrive.
  • Establishing Strong Roots
    Fall planting “establishes” trees and shrubs by encouraging root growth. Because the soil is still warm, the roots continue to develop until freezing, though the upper parts of the plant are already dormant. When transplanting in the spring, the developed roots are active and delicate tips or rootlets, as well as buds and new leaves, are more easily damaged.
  • Weather Resiliency
    Trees and shrubs planted in the fall are better able to withstand the rigors of the next summer’s heat and dry conditions because they have much longer to develop healthy roots systems and become thoroughly established. This is especially critical in dry climates or areas prone to drought or irregular rainfall.
  • Faster Maturity
    The “head-start” of fall planting results in a larger plant in less time, helping create a mature landscape without waiting for smaller plants to catch up. This can be especially critical when replacing dead or damaged plants in a mature landscape to avoid a gap or uneven look.
  • Water Conservation
    Planting in the fall saves watering time and promotes conservation by eliminating daily watering. Cooler temperatures with the addition of both morning and evening dew contribute greatly to soil moisture availability in fall without as much supplemental watering.
  • Color Confirmation
    Fall is the best time to see a plant’s autumnal color. Planting in the fall eliminates the surprise of the wrong color or unexpected shades that may not coordinate with nearby plants. By planting in autumn, you’ll know exactly what you’re purchasing and planting, and you will be able to match better with your existing landscape.
  • Saving Money
    Last but definitely not least, buying your beautiful trees and shrubs in autumn can save big money. We discount prices on trees and shrubs to create room for holiday season materials and pass the savings on to you. Selection may be more limited later in fall, however, so don’t wait too long to take advantage of great savings.

Autumn can be the ideal time to plant trees and shrubs, whether you are adding to your landscape, replacing plants or starting a whole new look. If you plant in autumn, you’ll be amazed at how lovely your landscape will look next spring.

AutumnWhyPlant_2

AutumnWhyPlant_3